How to make a bench for a do-it-yourself bench, useful recommendations
Many people want to have a beautiful body with embossed muscles. Unfortunately, not everyone has the opportunity to visit the gym, where there are special equipment. Keeping the body in good shape will help classes on homemade simulators, such as a bench for a bench press with your own hands - to make it yourself is not at all difficult. It is designed to train different muscle groups, and even in the circles of professional athletes it is considered an effective sports equipment.
Design Modifications
Benches for a bench are divided into two types: horizontal and adjustable. They differ both visually and functionally. A horizontal bench for bench press on four fixed supports is the simplest basic design. It implies only the lying position of the user during training. Such sports equipment is not very functional and is mainly suitable for working out the pectoral muscles, as well as the frontal deltoid.
In a design with three supports, two racks are used to install various equipment and petals for the bar. Most often, it is equipped with such sports equipment:
- block for legs - designed to perform exercises on the hips, calves, buttocks, as well as twisting for the press;
- additional handrails - will allow you to effectively train the lower part of the press;
- extendable racks - make it possible to perform exercises with a barbell without additional insurance.
- bars - for push-ups.
These and other devices significantly expand the functionality of the horizontal bench.
Another type of sports equipment for bench presses is an adjustable bench. In it, a sunbed (back) can be adjusted in height. The set includes racks with various devices: brackets, stops, clamps. Classes on such a bench can be carried out both sitting and lying, using equipment for dumbbells and barbells. On this simulator, you can perform a bench press at different angles, pumping many muscle groups. Such an adjustable bench is most convenient for installation in an apartment and does not require the use of other training equipment, as it performs many functions.
A simple horizontal design is easy to make. However, if you want to independently supplement such a bench with the above-described devices and an adjustable sunbed, you will need much more effort and dexterity.
 Horizontal on four fixed legs
 With three legs
 Adjustable
Varieties
Do-it-yourself bench benches can be made in two versions:
- all-welded construction;
- collapsible on bolts.
Each of them has its advantages and disadvantages. An all-welded bench is a monoblock, which is made by welding parts. Its main advantages are stability and reliability, since the used method of fastening will not allow the seams to disperse even under heavy loads. Such a horizontal construction is cumbersome, its installation is not possible in small rooms, which is especially important in a small apartment. Its functionality is also low, since it does not allow the use of additional devices. Such a power bench is structurally simple, which makes it durable. It is not difficult to make it if you have the skills to work with the welding machine.
A collapsible transformer bench is the best installation option in the house. It is compact and does not take up much space. Its functionality is higher than that of a monoblock. If you complement it with an adjustable back, you get an inclined bench. This will allow you to perform various exercises on muscle groups of the legs, arms, shoulders and buttocks, which gives a comprehensive development of the entire muscle mass of the human body. Install and disassemble it possible in a matter of minutes. Assembling a transformer requires the ability to use various tools, such as a grinder, a drill and others. Making it harder than an all-welded model.
 Collapsible bolted
 All-welded construction
Materials and Tools
The main material for the bench bench frame with your own hands is a professional pipe 4 x 4 cm in size. It is necessary to take a profile with walls no thinner than 2 mm. For petal holders under the bar, a strip of steel with a width of at least 4 cm and a thickness of 5 cm is needed.
In order for the frame to withstand heavy weight, the material of manufacture must have special strength.
The following materials will be required to assemble the sunbed:
- sheets of steel 2 mm thick;
- polished board;
- foam rubber 2 cm thick;
- durable water-repellent textiles or leatherette;
- universal glue.
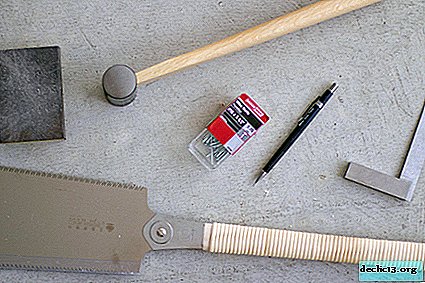
As fasteners, bolts and nuts are used, as well as a hinge for doors, to which an adjustable sunbed is attached to the base. The following tools will be required to make the bench:
- vise;
- knife;
- drill;
- stapler;
- welding machine;
- Bulgarian.
 Proftruba
 Steel sheets
 Polished board
 Foam rubber
 Upholstery
 Tools for work
Measurement of structural parameters will be carried out by tape measure. If you have the skills to work with the above tools, then making a bench for your bench with your own hands will not be difficult. In addition to the profile, the frame can be assembled from wooden parts. Materials that will be required to assemble a similar design:
- wooden bars of three sizes: 2.5 x 5 x 9, 5 x 5 x 25, 10 x 10 x 250 cm;
- plywood shield measuring 30 x 2 x 120 cm;
- bolts and nuts (M5 x 200 mm; M4 x 80 mm; M5 x 300 mm) - 4 pieces;
- washers from M5 nylon - 8 pieces, body washers M5 - 14 pieces;
- self-tapping screws 80 mm - 4 pieces;
- rubber overlay for racks.
Finishing will require impregnation, which increases moisture resistance, varnish for painting the finished bench. To make the home-made design more durable, you can use glue along with fasteners. Necessary tools when assembling the product:
- circular apparatus;
- saw or jigsaw;
- chisel;
- spanners;
- drill;
If non-sanded wooden blocks are selected, then a grinding machine will be required.
Wood is an environmentally friendly material, but not durable enough. In terms of stability, it is significantly inferior to the profile, since it is much easier. The service life of a structure made of wooden blocks is limited, so it would be more advisable to use metal ones - they are more functional.
 Wooden blocks
 Plywood shield
 Mounts
 Finishing Tools
 Assembly tools
Dimensions
Standard bench sizes for bench press are as follows:
- support length - from 97 to 122 cm;
- rack height in front of the bench - 83 cm;
- rack height in the back - 34 cm;
- width between front struts - 52 cm;
- the length of the supports for the front supports - 22 cm, under the rear - 30 cm;
- the length of the lounger (in the design of the adjustable bench) in the front part - 94 cm, in the back - 16 cm;
- the length of the lounger inclined design longer than the horizontal by 20 cm;
- bench width for bench press - from 29 to 32 cm.
The height of the structure above the floor is determined by the size of the lower arm of the foot lever. For reliability, it is advisable to leave a margin of about 10 centimeters. To choose the optimal length, you need to build on the growth of the athlete.
Dimensions vary based on the area of the room where the simulator will stand, as well as the build of the athlete. But for ease of use, making a bench narrower than standard sizes is not recommended. The width of the sunbed should not be less than generally accepted norms, since this parameter affects the work of muscles and, ultimately, the result of training.

Drawing creation
Making any bench model for a bench begins with a drawing. The figure should indicate all the design features of the future simulator and its dimensions. You can find a ready-made scheme on specialized resources, where all the nuances are described in detail. However, in this case it must be taken into account that the proposed sizes may not coincide with those that are necessary. To achieve the desired result, you just need to replace the original parameters. If you have experience training on a professional bench for a bench in the gym and performing exercises on it is effective, then you can take the dimensions from this projectile and make drawings based on them yourself.

Step-by-step production of an inclined bench from profile pipes
In order to assemble an inclined sports bench for a bench with three supports on your own at home, you need to prepare the materials and tools described above. The manufacture of the bench takes place in two stages: the design of the frame and sunbed. Before starting work, it is worth developing skills in using the necessary tools.
Frame
Metal frame assembly algorithm:
- Two pieces of 83 cm length are cut from the pipe, which will serve as struts of the frame, as well as support for the rod.
- At a distance of 34 cm from the lower edge of the rack, a mark is placed that indicates the place of connection of the elements with the next part.
- The third part of the profile, 52 cm long, which will connect the legs, and the fourth part, 34 cm long, are cut off for a stand on the opposite side of the bench, at the feet.
- To connect the front and rear legs of the bench, an element 97 cm long is cut off - this will be a support. It is welded to the rear pillar from above, while to the front - from the side. You can use self-tapping screws to connect parts.
- Specially prepared petals are attached to the profile pipe-racks from above or from the side. They are made of steel strips, which are bent with a vice in the shape of the letter "J". The long side of this part should be 7 cm and the short side should be 2-3 cm.
- Holes with a diameter of 1 cm are drilled to the crossbar connecting the front pillars. They are necessary for attaching reinforcing rods of 30 cm length that regulate the height of the sunbed.
In order not to spoil the flooring by the racks pushing into it, special devices are installed on them - expanders. The connection is also made by welding.
 Cut pipes to size
 Mark the joints of the parts
 Cut out support
 Weld the support to the rear pillar from above, to the front - from the side
 Attach prepared steel strip petals to the racks
Sunbed
An adjustable bench bench for training should consist of two parts, different in size. Build Algorithm:
- A short sheet is fixed in the legs, while it should protrude 5-10 cm beyond the end of the rack.
- A long sheet is set in the head of the bench. It is attached with a door hinge, then welded to the frame and to the base of the sunbed.
- Reinforced rods are attached to the bottom of a larger steel sheet at a distance of 10 cm from the edge. Their purpose is to raise the sunbed to train different types of muscles.
- A polished board is attached to steel sheets, the width of which should exceed the size of the first by 5 mm. The connection of the two elements is carried out by self-tapping screws. At the junction of metal sheets, the wooden board should be 1 cm shorter on both sides.
Using universal glue, foam is fixed on the prepared board. It must be pre-measured, leaving 5 cm to allowance. The plank bed is sheathed with dense fabric using a construction stapler.
 Cut corners and drill holes for attaching the board
 Weld mounts to the support in three places
  Install a sunbed with self-tapping screws
Connections
The connection of the details of the frame of the bench for the house is carried out by the welding method. Small parts are attached with bolts and nuts. Joints of wood and metal are also fixed with self-tapping screws, which should not go out of the structure. Welding work on the connection of the parts must be carried out with great care so that the seams do not diverge under high loads and vibrations.
 Attach the seat to the metal workpiece
 Set the back and sunbed
 Screw on the adjustment foot
 Finished bench
How to make a simple inventory of wood
The algorithm for manufacturing a simple two-leg construction bench for a bench made of wood is as follows:
- In the longest bar, which will serve as the base, grooves are cut out, racks are fixed in them with the help of fasteners and glue.
- Short bars are attached to the bottom of the racks. Grooves are also cut out in expanders, and racks are inserted into them. These details will give stability design.
- Smaller diameter bars are attached to the side of the main crossbar to get the necessary parts responsible for adjusting the lifting height. At the junction of the base and movable elements, nylon washers are used to avoid abrasion of the tree during operation of the bench.
- The plywood sheet, which will serve as a lounger, is mounted on moving parts, and is also attached to the support using a door hinge.
- Narrow grooves are cut out on the base. A bolt nut will subsequently be inserted into them to control the height of the sunbed.
- For feet, a smaller plywood sheet is mounted at the end of the bench.
- An inclined bench for a bench made of wood is covered with a composition that improves moisture resistance, and varnish.
In the manufacture of the basis should be taken the classic standard size of such products.
Designing a bench for a bench press with your own hands is not at all difficult. To do this, you do not have to be a jack of all trades. Armed with the necessary tools, the right blueprint and patience, everyone can make such universal equipment for training. Moreover, after a simple model is assembled, it can be modified at your own discretion. The result is a functional and durable sports equipment.
 Drawing
 Cut grooves in the longest beam
 Install the crossbar to the supports
 Attach smaller diameter bars to the side of the main beam
 Install nylon washers at the joints between the base and the movable elements.
 Use a bolt-nut to adjust the height of the sunbed
  Finished construction without sunbed
 Attach plywood sheet to moving parts
 Based narrow cut grooves
  Coat with stain and varnish
 Finished construction
Video
Watch the video: The $15 Fifteen Minute Bench - Easy DIY Project (December 2024).


-
Recommendations to gardeners when it is better to plant radish seeds in open ground
Juicy and tasty radish - a vegetable that tolerates cold well. In order to plant radishes, it is not necessary to allocate a separate plot in the garden. You can drop it earlier than heat-loving crops. When the time comes to move the seedlings to the ground, the radish will have time to ripen. The article describes in detail how to choose favorable days for planting, focusing on the lunar calendar, climatic bands of the country and other important aspects. ... -

-

-